


Week 8: Food Forest Design
- Jul 10, 2017
- 3 min read
Food forests are generally one of the first things that come to mind at the word ‘permaculture’. They truly represent what it means to create high-diversity edible ecosystems by combining plants of different functions and canopy layers together in high concentrations. Designing and creating one in a way that made sense ecologically, conceptually, aesthetically, and functionally was a fairly intimidating challenge.

Food Forest Diagram (Original from Permaculture: A Designer's Manual by Bill Mollison)
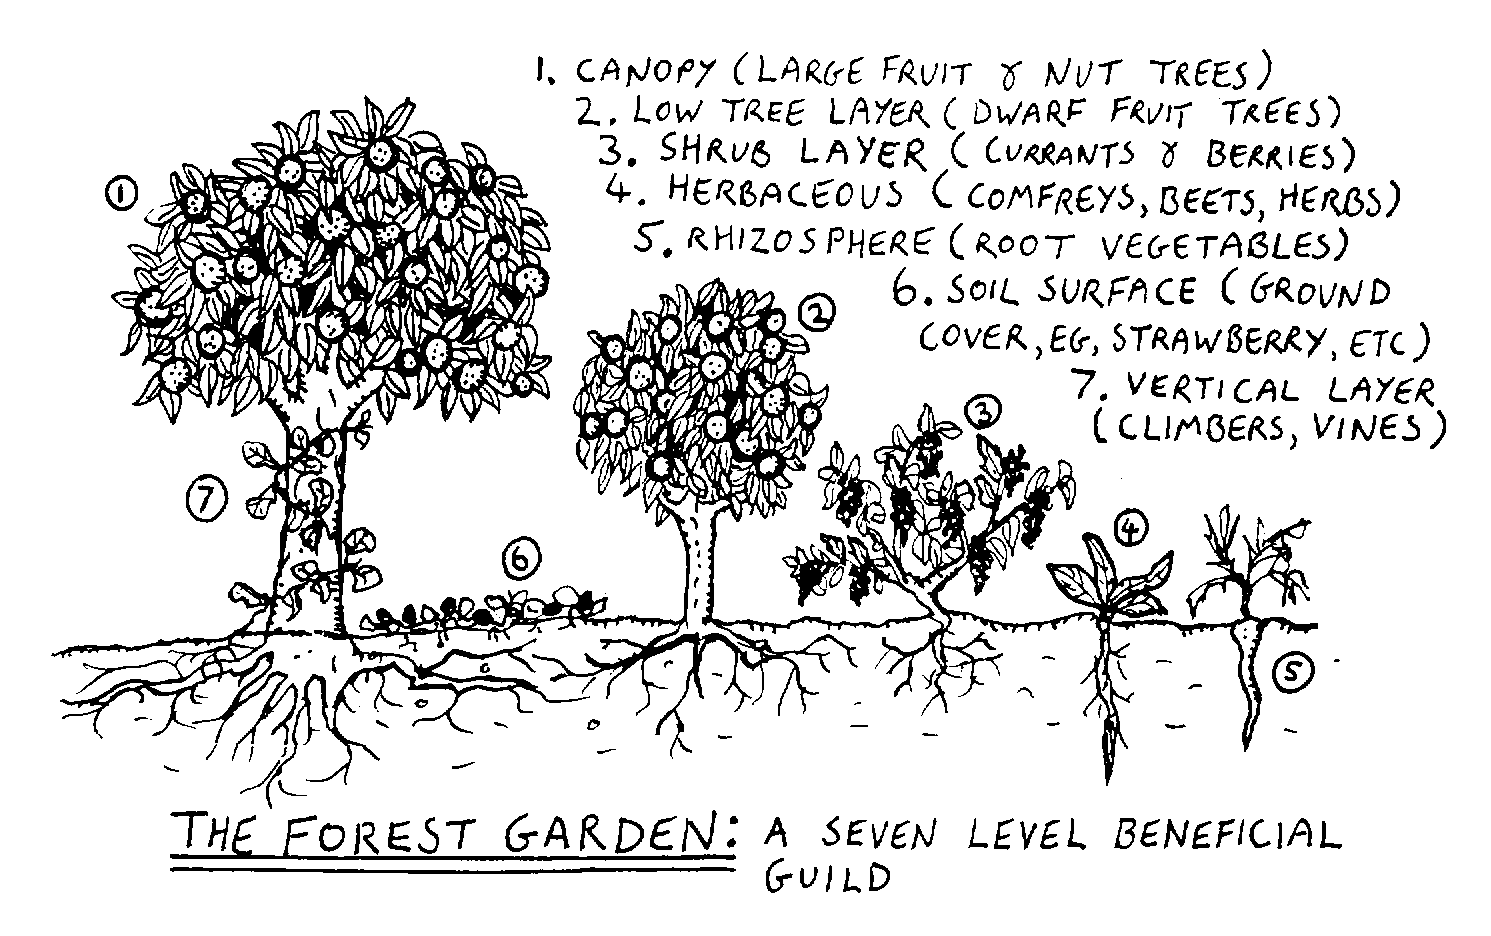
The canopy layer is the tallest of the food forest, and is usually a large fruit or nut tree. Due to the relatively small size of our garden, we opted for smaller species so that the entire area wasn’t eventually shaded out. The allocated space we had for the food forest only gave us enough room for two trees, and for most species at least two varieties were required two give fruit. To increase diversity, we decided to get around this by choosing cherry and apple trees with several varieties grafted onto a single root stalk. This way, each tree can pollinate itself, and will produce 4 or 5 varieties of fruit while taking up the space of only one tree.
Our subcanopy layer consists of a couple of small trees/ large shrubs that go around the trees in the center. We chose an elderberry, a goji berry, and two seabuckthorns, all of which produce edible berries. Because the plot was an irregular shape, they fit well into the corners that would be too small to fit a full tree.
Our tree order was delayed due to complications with ordering, so we haven’t been able to plant them yet, but the holes are dug and we are ready when they are!

Chris digging holes for the trees
Once the placement for the trees was figured out, we could plan and plant the herbaceous and groundcover layers around them. This was trickier than in the vegetable garden because the tree layers will cast greater shade. All of the remaining plants were carefully placed according to height and growing conditions, with the taller plants closer to the trees, and the ones requiring more sunlight on the outer edges. We also had to make sure that we had plants that played different roles- some attracted pollinators, some repelled pests, others that fixed Nitrogen or produced mulch, etc. to recreate a complete system that would be self-sufficient.

Food Forest Planting Guide

Lavender is part of the shrub layer around the subcanopy
Spacing was one issue, because planting to create a ‘forest’ is very different from planting in a cultivated garden bed. We started planting the herbaceous layer only a couple of meters from where the central tree will be planted so that the plants aren’t directly beneath the canopy, but will be close to the edge once the tree is fully grown. We planted in staggered rows circling around the trees in decreasing order of height to maintain accessibility. We also had to leave space for paths to enter, exit, and move through the food forest.

Thyme and Oregano planted on the edges as groundcover
In this exercise, the permaculture principle “Use edges and value the marginal” was important to keep in mind. The edges of ecosystems are usually the most diverse, because they incorporate aspects of what’s on both sides. Creating a small ‘forest’ is essentially all edge- this is where the different canopy layers come into play, and the many different microclimates become an opportunity for diversity and abundance rather than a hindrance.

Comments